


From Stradivari to Modern Violin Makers: The Evolution of The Italian Violin
Back to BlogEvery instrument is different, so before starting the process of making, it is important to know the instrument’s specifications and analyze its components, like the wood to be used. No matter what kind of instrument it will be, old, antiqued, copy, etc. The study beforehand is an important step, and it’s when the maker decides where to go with his new making.
Let’s take a look at the modern violin maker methods of violin making.
“I see each of my violins as an “act of creation”: each of them is a distinct individual born as the outcome of the research, study, design, technical skills, and artistic taste combined all together. Research and study are of paramount importance: I want my violins to have the best acoustical properties, so I make them out of top-quality tonewood.”
Andrea Giovannetti
It’s not just making a violin; being a modern violin maker demands many studies and skills. Most of them graduated from the best schools of violin making or spent years studying at workshops with experienced makers. As you probably know, this work has had a long and fascinating history for centuries! The violin’s predecessors include the medieval fiddle, rebec, and lira da braccio.
A violin is made by a luthier, which is what we call someone who builds, repairs, or restores string instruments. It is believed the word comes from the French name luth, meaning lute.
“The creation of my violins allows me to express myself artistically and translate my contemporary vision of the violin. My work is based on rediscovering the great masters of the ancient Cremonese School, adding new words each time, and a clear modern imprint.”
Fiorella Anelli
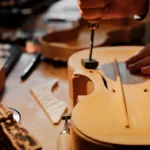
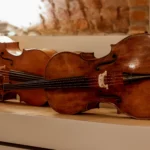
A violin’s life starts by choosing and analyzing the wood.
The choice of wood will directly influence the violin sound in the end. The back and the top pieces are cut to the shape of the instrument. The butterflied-shaped pieces are shaved by hand.
And then, we move to the dimensions. In an instrument, every detail matters. Each model will have some variation, but handcrafting violins means following exact measurements, or the final result will be different from what is planned.
The purfling
The purfling is smoothly inlaid and closely follows the knife-cut facets of the edge. It fits snugly into its channel with no sign of any filler, although there are several unconcealed gaps where the purflings do not quite meet in the corner mitres.
The bass bar, the heart of the violin
It is probably a very important part of the creation of the instrument, and it mainly has 2 roles.
First, to support the top. Without it, the top would collapse due to the combination of the pressure and tension of the strings. When the instrument is played, the bridge exerts a lot of weight straight down through the center of the top.
And second, it distributes the vibrations to the upper and lower areas of the top plate. It doesn’t sound easy, and it is not. Only skillful luthiers can perfectly fit its entire length.
Sound tuning
The key to a good instrument sound is the tuning of the bottom and top. And to do that, it is crucial to have a dry block of wood from at least ten years of drying. The thickness of the plates will directly interfere on its sound result, that’s why this is an important step during the making of these sounding masterpieces.
The scroll
This is one of the biggest charms of a violin; it’s here where we will see all the maker’s handcraft skills. Not to mention that the scroll is where most of the makers leave their imprints, unique expressions which can be a form of recognition and fingerprint of a maker.
Next: the neck
Here is where the connection between the instrument and the musician happens. The neck will influence the sound quality greatly, and its setting is one of the most complex operations in the violin-making world.
Usually, while making a violin, the top is glued first; then, you can set the neck. At the neck set, it is necessary to cut a piece of the top so the neck set can be done over it. Nowadays, we call it a mortise, so you fix the neck on the body with it, although they used glue and nails in the past.
“It’s beyond the beauty when it comes to violin making. “it is essential to create instruments that are not only beautiful but that offer excellent performance. I find it necessary to work alongside the musician; it is the only way to understand his needs.” – Martin Stoyanov
The label
The label is placed inside the violin to mark the make, model, luthier, and where the violin was crafted.
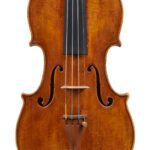
Edges
The edges of the violin show vigorous and robust working.
Varnish: one of the most delicate parts of the process
It needs to be soft as a breathing skin, allowing the instrument to vibrate without restriction when played, enhancing its power and resonant sound. The sealer coat protects and strengthens the wood from humidity and any other dirt. Then the top layers come to give the wood its vivid color and enhance its beauty. A lot of makers have their own recipe, having selected the different components matching their construction style.
It is a very long process that takes time, but all good things take time.
“I give full attention to all processes from raw material choices to set-up. My goal is to keep improving, and it is in my nature to be always concerned about searching for new ways to do it and never to stop evolving. Finally, I hear my clients’ opinions and critics and consider them in my work. In the end, my instruments express the dedication and love I have for each one of them.” – Luiz Amorim
LATEST POSTS -
Best Violin Brands: A Guide to the Makers Behind the Name
-
Venetian Cello Makers: Why Venice Is the Second Home of Lutherie After Cremona
-

The Testore Family: What Is Their History?
-
Notable Sale: Violin by Annibale Fagnola, Turin 1910
-
Should You Buy or Rent a Violin? A Smart Financial and Musical Decision
Best Violin Brands: A Guide to the Makers Behind the Name
Venetian Cello Makers: Why Venice Is the Second Home of Lutherie After Cremona
The Testore Family: What Is Their History?
Notable Sale: Violin by Annibale Fagnola, Turin 1910