

Varnishing A Violin: What’s Behind The Stunning Look Of A Violin
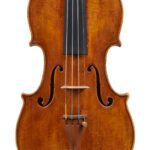
Back to BlogThat stunning look, shining or not, orange, brown, or even yellow. That credit goes all to the varnishing. It is a beautiful process and one of the most delicate ones of violin making, when the instruments are already on the finals and need great attention from the luthier. Let’s see what makes the violin varnish so intrigating.
It’s tricky because to do its job and not ruin the maker’s efforts, the varnishing must be soft as a breathing skin, so the instrument can vibrate without restriction, enhancing its power and resonant sound. One interesting fact is that a lot of makers have their own recipes, having selected the different components matching their construction style. Turning their instruments into an even more unique piece.
History plays a very important part in the development of the violin varnish.
Some may say there is a great deal of mystery surrounding the making of the violin. The combination of materials, from the wood to the strings, fittings, and varnish, as well as the interaction of the luthier with these materials, it’s all very complex. Especially on the varnish subject, this is one of the most complex ones. Therefore, today our mission is to bring you to the light!
Based on what we know these days, the varnishing comes a long way, and the ones that still exist can be found on wooden mummy cases from Egyptian tombs. Because the tombs protected it from the elements, this varnish—which was warmed and then applied with a spatula from a mixture of five or six parts oil to one part resin—still looks good.
The varnish used to make violins is actually a simple mixture of tree sap and mineral/natural oil. But it displays true synergy in its ingredients. The secret is in how the ingredients are put together that creates this new substance, so each varnish recipe forms its own characteristics.
Although the secret of the “great Cremonese violin varnish” from the past may never be unlocked, nowadays, there’s no big deal about it for its purpose and origins.
The Classic Cremonese varnish has some special characteristics that make it the pinnacle of violin coatings: a warmth of color, a liveliness of reflection, clarity, and longevity.
The Stradivari’s Violin Varnish
Whether the famous Cremonese varnishes were made by the violin makers themselves or by a local alchemist, one thing is sure: they were created with intent by a highly sophisticated workman.
Antonio Stradivari’s instruments have been studied to discover the secrets behind them, and with no surprise, the varnish is one of the high points. His varnish has many qualities that could not have been unintentional–it is far too consistent and sophisticated to be otherwise.
The golden period of violin making held the greatest of all violin varnishes, starting from the very first violins from Andrea Amati. This varnish was used for another 200 years, disappearing only in the 18th century.
An interesting fact is that, despite being called Italian varnish, this type of varnish has been found in other European instruments, a considerable amount from the Netherlands.
Still, how do luthiers create and use their own violin varnish today?
This is a very sensitive process. Even the room of the production requires extra care. Generally speaking, the wood is first treated with filler to prevent the varnish from being absorbed. Next, a colored varnish is applied in several layers. Each time, the varnish is allowed to dry and polished to give it a lustrous shine until all the layers are done. As mentioned, there are several recipes, and some go back to the Renaissance, but the essential ingredients don’t change, and that’s where most people mislead the making.
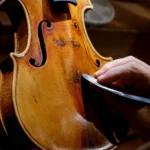
The whole process of varnish takes days to be done, and every step requires skills and attention from the maker. Here is the process of one of our makers, who likes to use a varnish that mixes spirit and oil.
- Once the instrument is finished in white, it’s time to be cleaned with warm water. In sequence, the maker goes to the drying process, scrapers and puzzle grass are used to give the instrument a velvety finish.
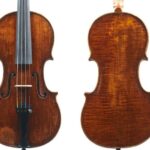
- Next, to achieve an old wood color similar to golden cinnamon, the oxidation of the wood’s surface is done through prolonged exposure in a chamber of UV and sunlight.
- After this comes the application of a sealing layer throughout the whole instrument and then layers of colorless and colored varnish.
- They are applied in 8 to 10 layers, the called varnish itself, the one you may see in photos and videos over the internet.
The ideal violin varnish has to protect the wood while being acoustically transparent.
Far from being just an aesthetic feature, behind the beautiful appearance of the varnish, there is an important role in the violin-making process. The sealer coat prevents damage from any humidity and also protects the wood from dirt. Then the top layers add color and make it more beautiful. It creates a barrier over the wood.
It’s crucial that the layers are soft enough to allow the instrument to vibrate without restriction when played, that’s because it affects the violin’s sound. For example, in-white instruments have a very free and open sound; right after varnishing, the instrument tends to have a closed sound.
Varnish is one of the most critical phases of violin/viola/cello making since it will work as a protective layer for the instrument. However, it needs to be soft enough to allow the instrument to vibrate without restriction when played, enhancing its power and resonant sound. Over time, with the musician practicing on the instrument and the varnish drying, the varnish improves the instrument’s timbre.
Today you can find a few types of varnish. Usually, the varnishes are divided into oil varnish and spirit varnish:
Oil Varnish
The basic ingredient for this product is oil, which is also the liquid part of varnish. The maker cooks the oil with the resin, provoking a chemical reaction and producing a transparent liquid. In this varnish, it is left to settle down in a jar after being cooked. The chemical magic happens, and it turns into a dense liquid.
Spirit Varnish
As the name gives out, its basic ingredient is alcohol. The alcohol works as a solvent, where the maker can insert resins. It’s easier than the previous one since there is no need for it to be cooked. After shaking it well, you will have to filter it and add color to get the appropriate tint.